Many of you have probably already seen this tutorial on Ucreate, but for those of you who haven't seen it, here is a tutorial for my Pinwheel Skirt. Enjoy!
The Pinwheel Skirt

You will need:
- 2 yards of fabric (make sure you chose fabric that hangs nicely. I used a linen for this one)
- (optional): 4 yards of lace or cute trim
- Zipper
I’ll give you the step-by-step instructions using my measurements, but just remember to substitute your own measurements.
(*note: s.a = seam allowance)
Waistband:
1. Measure the entire circumference of your waist
2. Add 1” to the length for a 1/2” seam allowance per side.
3. My waistband was 3” thick, but you can decide how thick you want it to be. Add the thickness that you want plus 1” to the width for a 1/2” seam allowance for the top and bottom.
4. Cut 2 waistbands with these measurements.
My waistband measured:
3” X 31” + Seam Allowance (1” X 1”) = 4” W x 32” L
Back:
1. Measure the length at the bottom of where you want your waistband to hit down to your knees.
2. Measure your waist at the bottom of there you want your waistband to hit. Divide this number by 4. There will be 2 separate back panels that meet up in the middle of your back, so this will give us the measurements for the width of those 2 panels.
3. Each panel will have a pleat, so you will need to add 8” to the width of each of the two back panels.
4. Add 1” to the width of each panel for a ½” seam allowance per side.
5. Add 1 ½” to the length of each panel for a ½” seam allowance on top and 1” hem on the bottom.
My 2 back panels each measured: 18”W x 22 ½”L
Width- 9” + 8” (for pleat) + 1” (for ½” s.a. per side) = 18”
Length- 21” + ½” (for top s.a.) + 1” (for bottom hem) = 22 ½”
Front:
1. Measure the front portion of your waist at the bottom of where you want your waistband to hit.
2. For the bottom width of the front piece, add 5” so that it flares slightly at the bottom.
3. Add 1” to the width of your front piece for a ½” seam allowance per side.
4. Add 1 ½” to the length for a ½” seam allowance on top and 1” hem on the bottom. (this length should be the same length as your two back panels.)
My front piece measured:
16” top width, 21” bottom width x 22 ½” L
Top width- 15” + 1” (for ½” s.a. per side) = 16”
Bottom width- 15” + 5” + 1” (for ½” s.a. per side) = 21”
Length- 21” + ½” (for top s.a.) + 1” (for bottom hem) = 22 ½”
Side Triangles:
You will need 4 triangles for the front ruffles on the skirt. The easiest way to do this is to cut out 2 rectangles and then cut them diagonally.
The long straight side of the triangle needs to be a few inches longer than the length of the skirt, because it will be tucked up into the hem.
The width of the top of each triangle needs to be about 1 ½ times the width of the front of the skirt.
For my triangles:
I cut 2 rectangles that measured 23” W x 26” L.
· To get the width, I took the width of the front of my skirt, 16”, and added 7”.
· To get the length, I took the length of the skirt, 22 ½, and added about 4”)
Then I cut each of them on the diagonal, giving me 4 triangles the same size.
Once you have all of your pieces cut out, you are ready to start assembling the skirt.
1. Sew the 2 waistbands together along the top with a ½” s.a. Press seams open, place wrong sides together, and iron flat. Set aside.
2. Take 2 of your triangles and place one on top of the other so that all sides meet up. Sew a ¼” s.a. along the side and the diagonal, leaving the top section open. Repeat this step with the remaining 2 triangles.
*note: I accidentally sewed the top section of the triangle instead of the side, so don’t follow my example.
3. Miter the corners of the triangles. Flip both triangles inside out so that the right sides face out and iron flat.
4. Take the top corners of your two triangles (where the shorter edge and the diagonal meet), and fold them back 5 ½”. Set aside.
5. Take your 2 back panels for the skirt. Along the top of the width of your first panel, place a mark 3” in from the left side of your fabric. Then mark 11” in from that same side.
6. With your second panel, do the same thing except place a mark 3” in from the right side. Then mark 11” in from that same side.
7. Fold each back panel so that the 2 marks on each panel meet to create a pleat. Iron flat only at the top of the pleat and pin in place.
8. Sew along the top of each pleated panel ¼” away from the top to secure the pleat. Set aside.
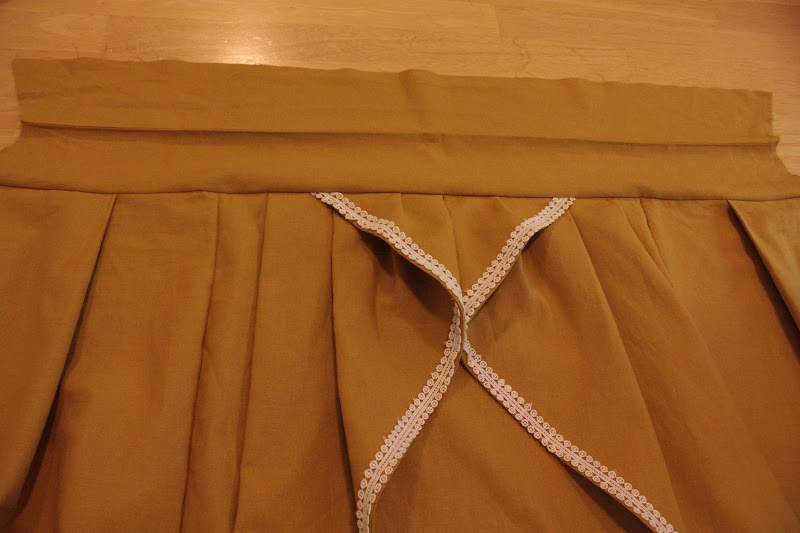
9. Take your 2 triangles and pin the long sides of each triangle to the sides of the front skirt piece. Make sure all top and side edges line up.
10. Mark the center point on the top of the front skirt piece, and pin each top corner of your triangles in the middle.
11. Now with all of the excess fabric in your triangles, create 3 pleats about 2” apart. I had enough fabric to tuck under each pleat 1 ½”.

12. Create 2-3 tiny pleats with the top two small triangles. Mine were only tucked under ½ - ¼ inches.
13. Sew along the top of the front portion of the skirt with a ¼” seam. This will connect the triangles to the front of the skirt and hold the pleats in place.
14. Line up the front section with the 2 back sections, with right sides together. Remember that the sides of the back panels are the furthest away from the pleat. Pin both sides together and sew with a 1/2" s.a. Stop sewing when you get 5” from the bottom of the dress.
15. Move the bottom of the triangles out of the way, and hem the skirt by folding under ½ ”, then ½ ” again.
16. Fold the bottom ends of the triangle under the skirt, letting the triangles hang 1” longer than the hem. Pin in place.
17. Finish sewing the bottom 5" of the side seams with the ends of the triangles folded under.
18. Sew the side seams together with a ½” s.a. and serge or zigzag stitch along the side seams to keep from fraying. Do the same thing to each side of what will be the back center seam.
19. Open up the waistband and pin one side of the waistband all along the top of the skirt, with right sides together. The opening of the waistband will be in the center of the back, lining up with the center of the two back panels.
20. Sew the waistband to the top of the skirt with a ½” s.a.
21. Flip the waistband over so that the right side is facing out and iron flat. Fold the remaining raw edge under 1/4" and sew around the bottom and the top of the waistband very close to the edge to give a finished look.
22. Now it is time to insert your zipper. Sew the back of the skirt together (right sides together) with a ½” seam, but remember to switch to a basting stitch the length of your zipper when you get to the top.
23. Insert your zipper. I used this tutorial.
Voila!! Your Pinwheel Skirt is now complete!
Labels: sewing, skirt, tutorial