HOME       SHOP       TUTORIALS       PAST PROJECTS       SPONSOR       CONTACT ME       ABOUT ME       READER SUBMISSIONS


Monday, September 20, 2010

The Socialite Skirt

I promise this will be my last time using blue and white striped fabric for a while. I just had enough left over from my Nautical Dress to whip this baby out.  


I decided to make the waistband on this skirt stretchy.  It is just nice to be able to pull it on with a shirt and go.  It's a lot more casual, which is nice for lounging around, soaking up the last few days of the summer sun.

Want to make one?

You will need:

  •  Approx 1 yard of a knit fabric, or something with a little stretch already in it.  My fabric measured 36" x 50"
  • Elastic thread
* Note:  Keep in mind that all of the measurements I have listed are my own, so make sure you measure your own waist, skirt length, etc accordingly.
Step 1:  Cut out 2 waistbands that measure 4"w x 36"l (I wanted a thicker waistband).  
Cut 2 sections for the skirt front and back.  Make the width of the skirt be about 2 times wider than your waist.  Mine measured 36"w x 20"l (adjust length accordingly)

Step 2:  I think the skirt looks better with a tiny bit of flare at the bottom.  Fold your front section in half, and cut a slight diagonal, so that the bottom is about 5" wider than the top.  Do the same thing for the back skirt piece.

Step 3:  Take your front piece of the skirt and make a mark at the middle.  Create a large 4" box pleat.  To do this, mark 2" away to the right and left of the middle mark.  Then, go 2" further from those marks and fold under, with the fold pointing to the middle of the skirt.  A 4" box pleat takes 12" to create.


Step 4:  Now you are going to create 2 knife pleats on either side of the middle box pleat.  When you fold the fabric under for the pleat, make sure that the fold points toward the middle.  So the folds to the right of the middle will point left, and the folds to the left of the middle will point right.  Does that make any sense?  Look closely at the pictures.  It will make more sense than I do.

My smaller knife pleats are even spaced out, 1 1/2" apart.   I folded each knife pleat under only about 1/2".  You can eyeball how deep you can make your pleats by placing a ruler at the top as a guide to how wide you need your skirt to be (keep in mind your seam allowances).

Iron all pleats nice and flat.


Step 5:  Take your back skirt piece and create 2 inverted box pleats.  To do this, mark the middle of your skirt.  Now, make a mark 3 1/2" to the right and to the left of the middle mark.  Make another mark 7" to the right and to the left of your previous marks.  Match up 2 far right marks to create an inverted box pleat, and then do the same with the 2 far left marks.

For example:
 
E  C  A  B  D

'E' and 'C' would match up, and 'B' and 'D' would match up to create the pleats.  'A' remains your middle point.

Pin and iron the pleat flat.


Step 6:  Now take your two long waistband strips, and cut each one in half, creating 4 pieces that measure 4"w x 18"l (your length will vary depending on your measurements)

Step 7:  Wrap your elastic thread around your bobbin and insert it into your machine


Step 8:  Place 2 waistband pieces right sides together and stitch the length of one side 1/4" from the edge.  You will see the fabric start to bunch up as you sew with the elastic thread.  Don't freak out.  This is a good thing.


Step 9:  Flip those waistband pieces right side out and iron flat.  Then stitch along the same side with the fabric right side out, 1/4" from the edge (still using the elastic thread).  As you sew, pull the fabric taut, since it will want to bunch up because of the elastic thread.


Step 10:  Open up your waistband and sew the front of your skirt to one side of your waistband with right sides together with a 1/4" seam (still with the elastic thread).


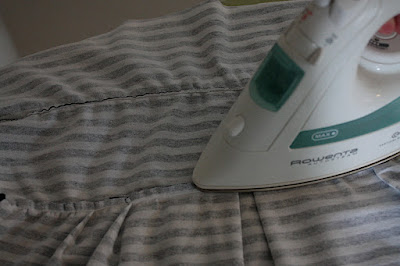
Step 11:  Flip the waistband up so the right side is facing you, and iron along the stitch you just made.  As you iron, make sure the selvage from your seam is pointing up into your waistband.  I found it easier to keep track of the waistband by flipping it over to the backside so that I could keep a close eye on it.


Step 12:  Now, with the wrong side of the fabric facing you, iron the very top end down 1/4".  Fold this half of the strip down, creating your waistband and pin in place.


Step 13:  With the right side of the fabric facing you, stitch along the bottom of the waistband, 1/4" from the bottom to secure the fabric that you just ironed under.  It is important that you have the right side of the fabric facing you so that the elastic thread only shows through on the back side.  I learned this the hard way.

Now, repeat steps 8-13 with the back waistband/skirt pieces.


Step 14:  Match up your  front and back pieces, right sides together and stitch down each side with normal thread in your bobbin now (no need to have stretchy side seams), about 1/2" from the edge.

Feel free to surge or zigzag stitch your raw edges.  If your are using jersey fabric, you don't have to worry about it fraying.  However, it will give your skirt a more finished look.


Step 15:  Iron the bottom of your skirt under 1/2" and then under 1/2" again and sew along the top for your hem.


And there you have it.  A quick easy skirt.  And the best part..... no zipper!


Perfect to wear while chasing after cute little toddlers.

40 comments:

  1. Nice tutorial! I have to try!
    Thanks!
    Gina
    macadentada.blogspot.com

    ReplyDelete
  2. Sooo cute! Totally trying this one.

    ReplyDelete
  3. Wow this is so cute! You always go into my "want to try this" file:-)

    ReplyDelete
  4. Great skirt. I know I would enjoy wearing it. Thanks for the step by step.

    Trudy
    www.sewingwithtrudy.blogspot.com

    ReplyDelete
  5. Yes very, very cute chasing a toddler or not. :)

    ReplyDelete
  6. Ok very silly question.. Where do you find knit stripe fabric? I have looked at Joanns because you can usually se a coupon there. I'd love to know!
    bgrimnes@gmail.com

    I just found your blog and am instantly in love with it! I hope you are ok if I link it to mine!

    ReplyDelete
  7. I am so excited to try this but am really no good at figuring out the measurement part. Can you tell me which measurements you used so I can figure out how to convert it? I know you used a waist measurement, but did you use your true waist or just above your hips where the skirt sits? Sorry this is probably a silly question. I am really dense at sewing without a pattern =)

    ReplyDelete
  8. Melanie-

    I used the waist measurement of where I wanted the very top of the waistband to sit. With a thick waistband like this one, the bottom of the waistband will be a little wider around then the top, but it's ok because the elastic thread is stretchy and you won't have a problem getting it to fit. That is the nice thing about using elastic! Good luck! Let me know if you have any other questions.

    ReplyDelete
  9. This is absolutely adorable. I am so impressed! Still a beginner with sewing, but I am definitely giving this a try. And seriously, step by step photos are so nice to have.
    Thanks for sharing!!

    ReplyDelete
  10. I found it! Thank you so much for such thorough instructions. Lovely blog, lovely pictures.

    PS: I'm the one from the park today :)

    ~Bree

    ReplyDelete
  11. I have a silly question. I'm trying to make sure that I get the measurements correct, and I wanted to see if you started with a piece that was 36"x21" and then cut the piece so that the bottom was 5" bigger than the top or if you started with a piece that was 41"x21" and then cut the sides. Also, I've never taken my measurements to make clothing before. I was wondering what size you normally wear. My measurements are coming out about the same as yours but I feel like you look a little bit smaller than me so I thought I would check.

    ReplyDelete
  12. I've been wanting to re-learn to sew for a while now---it's been a good long time since my short career making doll dresses over 20 years ago, and unfortunately the sewing machine I used as a kid was garage saled a while back--but all these cute blogs making cute outfits and bags and curtains online has had me itching to pick it back up again as an almost 30 birthday gift to myself. So I've spent the last hour researching machines and its really rather overwhelming. Overstock has quite a few which have great reviews in the under 200$ range which is where I'd like to stay. So my question for you is, 1) do you have a recommendation for a beginner machine? 2) will I be able to successfully sew knits with just a zig zag stick or will I just be frustrated without a serger--which all seem to be at least $300 and WAY over my budget, and finally, 3) your instructions seem so straight-forward, do you think that this is a manageable first-time-in-two-decades-beginner project?

    Thank you! LOVE LOVE LOVE your blog!

    ReplyDelete
  13. I love this post and the explanation on the pleats is great!

    ReplyDelete
  14. This is so wonderful! Can't wait to make this skirt for the summer (and a baby version for my daughter)!

    ReplyDelete
  15. I love this pattern! What a great tutorial too. I think I have the perfect fabric in my stash for it too :-)

    ReplyDelete
  16. Love this! It looks great in stripes!

    ReplyDelete
  17. Adorable...I always sew for my kids, never for myself. I need to change that...starting with this skirt. Thanks!

    ReplyDelete
  18. I would love to try and make this, but I have just begun to make things and I am not sure I am ready for this! Some things I do not even understand what to do! I really love it though! Hopefully I can do it one day! I really love that fabric too!

    ReplyDelete
  19. The best part is no zipper! LOVE THIS SKIRT! SO cute! I am so excited I found your blog! Definitely following... :)

    ReplyDelete
  20. I've been sewing diapers and clothes and toys and all sorts of things for my kids for a couple years now and this skirt tutorial is going to be my inaugural foray into sewing for myself! yay! Thanks for the wonderful tutorial.

    ReplyDelete
  21. lovely tutorial... so many details! following your blog right now!

    ReplyDelete
  22. Very Cute! My daughter wants me to make one for her. Question: Between steps 6 and seven it looks like you tapered the waistband a bit. True? If so what did you use for measurements for it?
    Love the tutorial. Thanks for sharing!

    ReplyDelete
  23. very cute!
    Do I cut one piece 36wide by 20" long and then cut that in half to make a front and back piece? That makes sense, I'm just checking....however with the pleats I wasn't sure....

    ReplyDelete
  24. Janice- Yes, I made the top of the waistband slightly more narrow than the bottom. Only by about 1/2" though. I think it gives it a little better fit.

    ReplyDelete
  25. Krystle- You cut out 2 pieces that would be 36" by 20" long. One for the front and one for the back. you want enough extra fabric in the width to create the pleats in the front and back.

    ReplyDelete
  26. Leanne - When you say you "double" your waist size do you take your waist size x 2 = each panel measurement? for example
    waist = 30"

    so

    30x2 = 60
    Therefor I would cut 2 60"x20" panels? That doesn't sound right, I'm either mathematically challenged or really fat...

    ReplyDelete
  27. Ooh Baby: you're not fat. I've been puzzling over that point for the past ten minutes.

    I'm looking at my fabric and doubling the 68 generous inches I took seems overboard, plus I wouldn't have enough fabric. Here goes nothing!

    ReplyDelete
  28. First of all, ADORABLE skirt!

    I'm having the same question as your last two posters...I doubled my waist measurement (60) and that seems like a TON. But I cut it out anyway and did the pleating - however, I still have 41 inches left (roundabouts). What am I doing wrong? If I sew it up like that it'll never fit me :)

    ReplyDelete
  29. gorgeous skirt an great tutorial. glad to have found you {via pinterest}

    rachel

    ReplyDelete
  30. I think the problem is that her waist size is pretty close to how much fabric you need to make the pleats (12 inches and by the math her waist is 18 inches?). So I'm wondering if it would be more accurate to say divide your waist measurement by 2 and then add 12 to 14 inches (for the pleats)? I'm thinking you would divide by 2 because you'll have a front and a back, which when added together will give you the circumference equal to your waist? I haven't done this skirt yet though.

    ReplyDelete
  31. About "doubling" the waist measurement- although it may be too late for some already, what she means is to double your waist measurement and that's what the bottom circumference of the skirt should measure, not the top. You'll want the extra room around your knees so you can walk/run/chase toddlers easily. Hope this helps!
    Cheers!

    ReplyDelete
  32. I found your blog through Pinterest- LOVE LOVE your tutorials- you do great things with fabric. Thanks for sharing!

    ReplyDelete
  33. are you supposed to sew with the elastic thread and have in in your bobbin?? I am trying to sew with it and it is NOT working!

    ReplyDelete
  34. What a mystery this has become. I think what she meant by "doubling" your waist size is to double the width of your waist, not the circumference of your waist. Her waist is probably 18 inches wide when you look at her straight on (well, probably less once you account for 1-inch seams and from what I can tell of her body type in pictures)... therefore she used 36"w for the front panel and 36"w for the back panel. Not 72"w for each!

    Once everything is pleated and sewn together, this cuts everything in half. Therefore the two 36"w panels become <18"w, and when you sew them together, they make a <36" circumference skirt to fit her <36" circumference waist. :)

    ReplyDelete
  35. Love this skirt! Wish I could do this!

    ReplyDelete
  36. Okay maybe thisis silly but I've never sewn with elastic thread and I am wondering how you threaded it through your needle. I tried sewing it with just the elastic thread in the bobbin and not the top since that was the only place it mentioned putting the thread through the machine and it didn't bunch... So now I'm not really sure what to do since I can not manage to get the thread through the needle. Any tips? Thanks!!!

    ReplyDelete
  37. Before I start the adventure of sewing this as my first skirt by myself I have the same questions as above & would love to know exactly before I dive in... So the panels should be waist circumference EACH? So I would have 2 panels 31" wide, correct? And as far as the thread goes it sounds tricky, do you put it only in your bobbin or top as well? Thank you! Not trying to be the obnoxious one that repeats everything! :)

    ReplyDelete
  38. As far as I know, you put the elastic thread only in the bobbin (which makes sense because I don't think it would work to try and thread it through the machine) I then wrapped it manually (meaning with your hands, not your machine) because you don't want it tight like your thread normally is. I don't know why yours (crtanner) didn't bunch? When I've used it in only the bobbin, it bunched correctly. I don't know if that helps but hopefully it does!

    ReplyDelete
  39. Brilliant! Love the pleats! Great fabric choice too! Thank you for sharing! I'll be trying this for my 13 y/o daughter and myself!

    ReplyDelete