Ever since I started doing my own eyelash extensions, I've had lots of questions about them, especially over on my
instagram. Hopefully this post answers all your questions! I am giving you a start to finish tutorial on how I do mine. As a blonde, my eyelashes are pretty much invisible without mascara. On top of that, my eyelashes are straight, so the process of curling my lashes and applying mascara takes the majority of my time when I do my makeup. With a third baby and 2 kids in school, I am constantly running out the door for school/errands, and since I've been using
these extensions, it has made getting ready to go
so much faster! For those wondering, this is different than just wearing fake lashes. The glue for these is a much stronger bond and can last up to a week or more depending on how well you apply them. It comes with a clear glue, but I highly recommend getting
this dark glue that dries black. It's a big bottle and lasts forever. They are synthetic
lashes, and have 4-5 individual lashes attached to each one, making the application process a lot faster than applying one single lash to each one of your lashes.
I've tried the normal eyelash extensions before, and they were great. But they were expensive, and I just don't have 2-3 hours every few weeks to go in and get them filled.
These eyelash extensions are $10 to get started! $10 you guys! And the
refills are only a few dollars and last me at least 2 applications. It is so crazy cheap! I have been telling everyone I know about these at-home lash extensions. Now that I have used them for over a month, I can apply a full set in about 20-30 minutes, and they last me a full week without having to do any touch-ups.
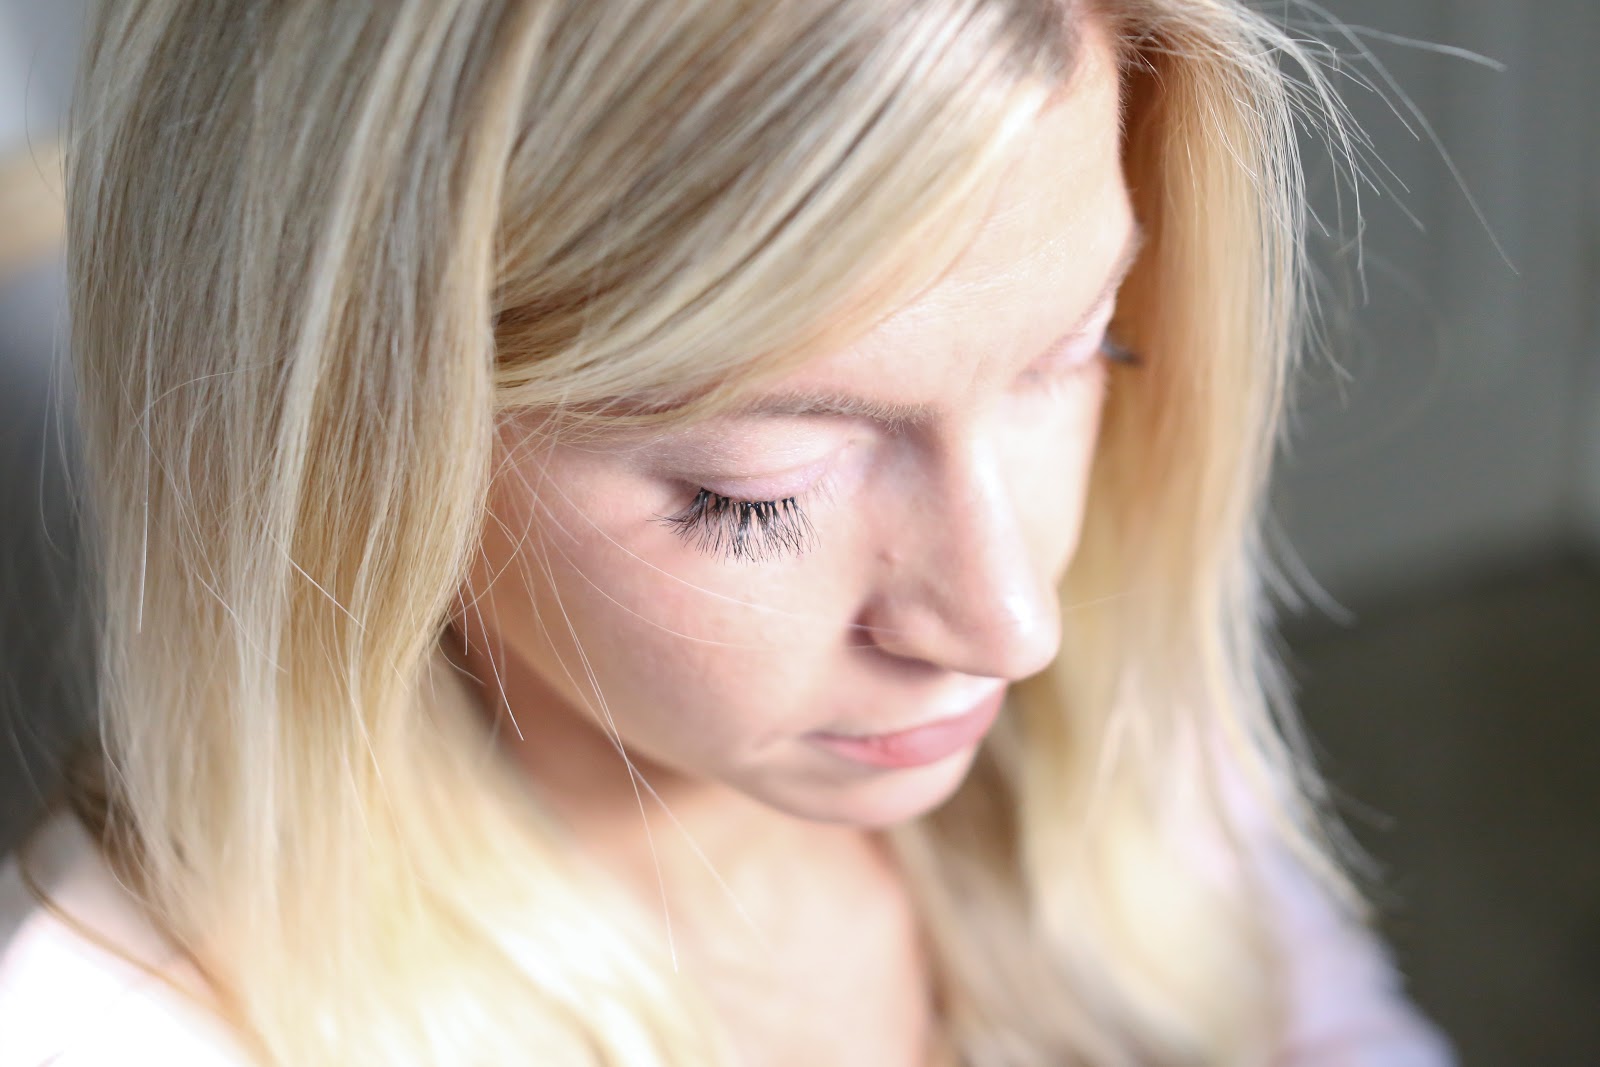
Let me tell you, waking up with a full set of black curled lashes is a GAME CHANGER for a blonde! Eyelashes make the biggest difference, and my eyes disappear without them. Now I feel like I'm 70% ready for the day before I even start putting my makeup on.
Ok, onto the tutorial...make sure you read all my notes at the bottom of the post as well. I talk all about how to care for and remove your lashes.
MATERIALS:
- The starter kit is by Ardell and you can get it here. It includes the lash glue, lash remover, tweesers, and short, medium, and long lashes.
- I also recommend grabbing at least 1 refill of the short lashes and the medium lashes. (I don't use the long lashes, they are just too fake long for me). They even make these mini lashes that they say work for lower lashes, but I think they would be good for top lashes too.
- Also, a mascara wand (super inexpensive) will help you maintain your lashes.
- I recently purchased this black Ardell eyelash extension glue, and I love it! The glue dries black, not clear, so it is much less noticeable, and gives more of an eyeliner look along your lash line.
STEP 1:
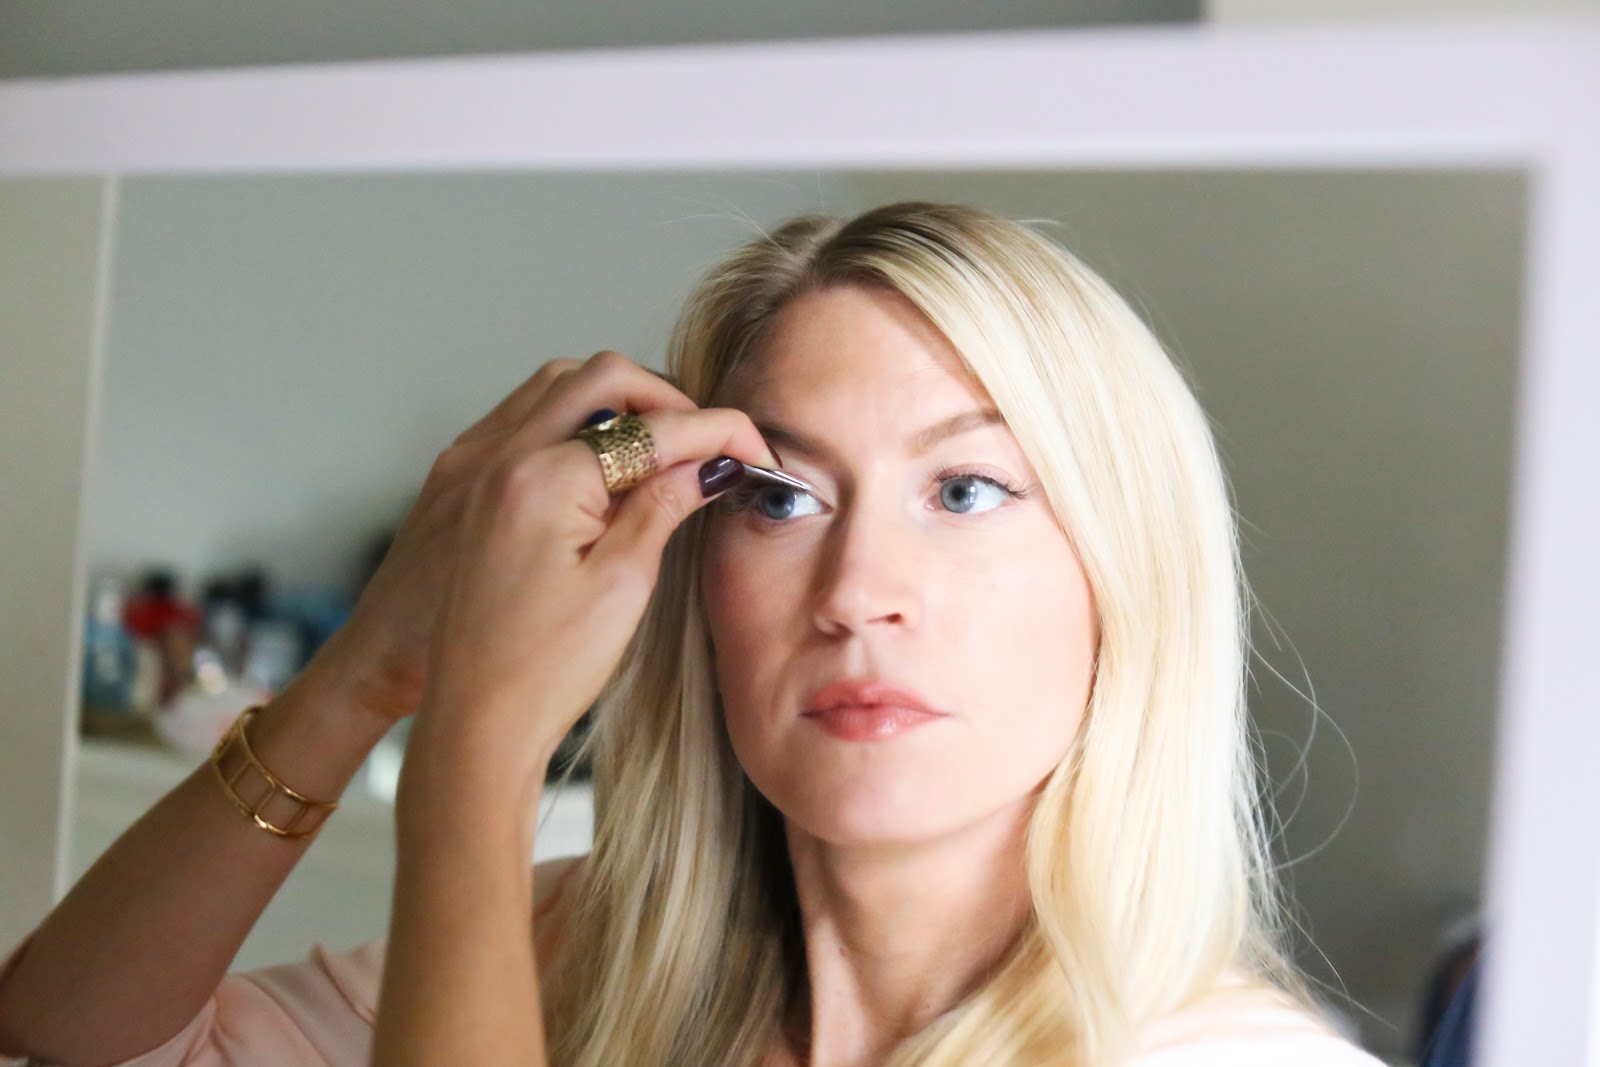
Each lash is a tiny bundle of about 8-9 lashes, all connected by a tiny ball at the bottom. I'm going to refer to one of these as an 'individual lash', but know that each one is connected to a group of lashes. The first step to placing each individual lash correctly, is to hold the lash with the tweezer correctly. Grab the group of individual lashes a tiny bit above the ball (see pictures above). If you are too close to the ball you will get glue on the tweezers, making them hard to get to stick to your lashes without getting stuck to the tweezers.
To get the glue on the lash, I've tried pouring the glue onto a small strip of foil, but the glue is hard to see and gets tacky too fast. I've found that the easiest way to apply the glue to the bottom ball of the individual lash is to hold the glue container in one hand and the tweezers in the other, and slowly tip the glue container till the glue is close to pouring out. When the glue is close to the edge of the container, dip the ball of the individual lash into the glue right from the container. This way the glue doesn't dry up and its a lot less messy. Try not to get too much of the glue on the actual lashes, but get a good amount on the ball so that there is enough to adhere to your lash.
STEP 2:
Start with applying the first 2-3 MEDIUM length lashes to the outside of your right eye (working your way toward your inner eye) and then repeat with your left eye, working from the outside in as well. To apply your individual lash, keep holding the lash with the glue on it, and gently place it on top of one of your own lashes. Slowly sweep the ball with glue on it along the top of your own lash to add glue along the top of it, then place the individual lash on top of your lash. Try not to attach your individual lash to your skin. I glued a row to my skin on accident one time, and it irritated my eyelid for a day or so. Once your lashes grow out naturally, they will stick to your lashes and not your lid anymore, but try to get them just on the lash. Also, setting them too far away from the base of your lashes will show the little black ball at the end and look messy and obvious. The individual lash is moveable for about 60 seconds after placing it, so feel free to adjust it a bit if needed before it sets.
Place the next individual lash as close to the previous lash as possible. The closer they are together, the fuller and more natural your lashes will look. I like to have the tiny balls at the end of the lashes basically touching each other all along my lash line. I also like to 'double up' on my lashes - I place one individual lash on one of my lashes, and another one on one of my lashes right above it, so that they are nice and full. That way, if a few fall off over the course of a few days, you won't be left with an empty spot that you have to rush to refill.
STEP 3:
I apply the medium length lashes only to the very ouside edges of my lashes. If I continue them in to halfway across my eye I feel like it looks too long and fake. After applying 2-3 medium length lashes to the outsides of each eye, I apply the SHORT length lashes. This will make your lashes look more natural, and not too long on your inner eye. Keep working from the outside toward the inside of your lash line, like you did previously, adding 3-4 at a time to each side so that both eyes look even. Apply the short lashes as close to your inner eye as possible. Since these lashes are a lot smaller, they can be a bit tricky to attach to your own lashes. Just go as far in as you can.
STEP 4.
As you apply your lashes, they will need to be pushed down to rest on your actual lashes every so often. With your tweezers closed, gently press your individual lashes into your lash line to ensure that they stick to your own lashes. Also, since my lashes are straight, sometimes I will open the tweezers so that both the fake and real lashes are in between the prongs, and then squeeze the tweezer prongs together so that my own lashes stick to the fake lashes better.
STEP 5.
Once your lashes are applied, don't add any mascara or eye makeup for a few hours to make sure the lashes set completely. I try hard not to touch them or smash them on my pillow when I sleep at night so that they stay nice and curled. In the morning, they may get a bit uneven, so use your mascara wand and gently brush them out, curling the wand toward you. Make sure you only do this on top of your lashes.
The first time you apply your lashes it could take you a good 30-40 minutes to get the hang on things. And it could be a big hot mess. Don't stress! It took me applying them 3-4 times before I really felt like I got the hang of them. They will probably look a bit skiwampus or thin the first time you apply them, but the more you do it the better they will start to look, and the faster you will get at doing them.
EYELASH CARE AND REMOVAL
Removing the eyelashes can be tricky, and a bit of a pain. But let me say that it is not as much of a pain as trying to remove professional eyelash extensions! I read a lot of negative reviews about the eyelash remover that the starter kit comes with. It didn't burn my eyes like some of the reviews said, but it doesn't make the lashes come off as easily as I would have liked. Here is my solution- I wear the lashes until they basically fall off on their own. If you place them all nice and close together, they usually come off after a while on their own in a clump. Sometimes the lashes are starting to fall off and still attached to 1-2 lashes, so I use a Q-tip and dab the lashes with the lash remover and gently massage it into the lashes, without it touching my other lashes. This will cause the fake lashes to come off, but make sure to be very gentle when doing this.
I wouldn't recommend trying to take the lashes off before the start to fall off on their own. If some fall out, just replace them for a while. After about a week they will be a lot easier to remove. There is usually a day or so where the lashes start to come off easily in clumps. I just have to make time to put on a new set at night or in the morning the next day. I do walk around with what I call "wolverine lashes" for a day sometimes (this is when I'm only left with eyelashes on either corners of my eyes. It looks ridiculous). If I don't have time right then to apply more lashes, I just throw on a pair of sunglasses and take my kid to school. Because in the end, I would rather have a few lashes you can see, than completely invisible lashes.
WEARING MAKEUP WITH YOUR LASHES
When I first started applying my lashes, I still applied mascara to my own lashes (make sure the mascara is NOT waterproof!) My lashes are so blond you would still see them poking through. But when I learned to apply the lash extensions on top of each other, nice and thick, I stopped needing to apply mascara. I still apply mascara to my lower lashes. (side note- I just bought eyelash dye and am going to dye my lashes black to make them fill in even more. Let me know if you want a tutorial on this!)
Curling your own lashes before applying the lash extensions is pointless because after a shower, your lashes will go back to being straight. I've found that if you get your whole straight lash to glue along the lash extensions, it helps keep the straight lashes from being visible. And again, the thicker you apply the lashes, the less of your natural lashes you can see, even if they are long and straight, like mine.
MAKEUP REMOVAL
When I wash my face at night, I remove my makeup with those thin round makeup remover pads or a Q-tip. Don't use a cotton ball because the fibers will get stuck in your lashes. I don't always wear eyeliner along the top of my lashes, but when I do, its a liquid liner, and I remove it with a Q-tip. Also, make sure to use an oil free eye-makeup remover. As for washing the rest of my face, I just am careful not to scrub my lashes, and clean around them.
I never ever go to bed without taking off my makeup. Especially my eye makeup. If I sleep with it on it irritates my eyes. For the first few days of wearing the lashes, I noticed that it irritated my eyes a bit in the morning. I am just careful to remove as much of my eye makeup as possible and I haven't had a problem with the irritation since then.

FAQ'S:
Do they damage my real eyelashes?
I notice 1 or 2 of my eyelashes attached to the eyelash extensions when they fall out. At first this made my hyperventilate and I wasn't sure I would put them back on after taking them off for the first time. After going back to my normal lashed for a while and remembering what a pain it was to curl and apply mascara every morning, I decided losing a few lashes was worth it. I didn't lose nearly as many as I lost after having professional eyelash extensions. And your lashes fall out normally, like hair on your head does. I also felt better about it when I started letting the lashes fall out on their own, rather then trying to get them off with the eyelash remover.
How strong is the glue?
The glue is strong enough to hold for a week or so. Over time and after putting eye makeup on with the lash extensions, the glue bond will weaken and be easier to remove with the lash remover.
How long to the refills last?
I always buy 2 medium and 2 short refills. One medium and one short refill last me about 3 applications (so touchups throughout the week, and then full applications once they start coming off in clumps)
*Let me know if you have any questions! I'd be happy to answer any questions I don't already cover!
Labels: beauty, LB at home, lifestyle, tutorials