
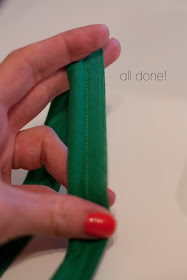
Piping can give a great completed look to pillows, headboards, bumper pads, etc. But finding the perfect fabric in pre-made piping is often impossible. That doesn't mean you can't get the piping that you want. Here is a tutorial on how to create your own piping:
There are a few tricks for creating the perfect piping. I used the following technique on Cash's bedding in the boys room.
Materials:
- Cording (whatever length you need). This can be purchased at Joanns or any sewing store. There are many different sizes of cording depending on the look you want.
- Fabric to cover the cording. A little goes a long way, so that is pretty nice. It took me only about 1 yard of fabric to cover 4 yards of cording.
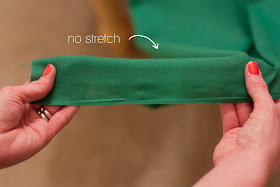
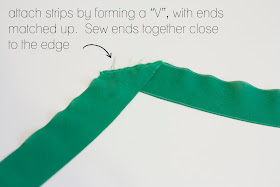
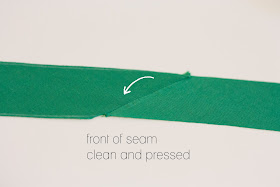
The trick to getting clean looking piping is how you piece the strips of fabric together. When you pull your fabric straight across, you won't get much stretch. But when you pull it on the bias (diagonal), you get a nice stretch. You will need to utilize this stretch especially when sewing piping around corners. If you were to cut straight across, you wouldn't get any stretch in the fabric, and that will cause puckering in the fabric especially when stitched around curves.

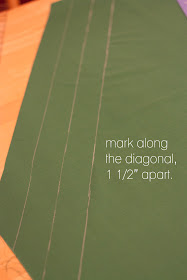
note: 1 1/2" strips covered my cording (mine wasn't very thick). Test out how wide your strips of fabric need to be by wrapping the fabric around your cord and allow for 1/2" seam allowance.


note: when making this stitch, I would suggest not sewing the stitch too close to the cording. Stitch about 1/8" away from the cording. Then, when you sandwich the piping in between your fabrics, use the zipper foot again and stitch as closely as possible to the cording. This way you wont have to worry about your first row of stitching being visible.
-------------------------------------------------------------
Giveaway Winner
click here to see if you won the Wild About Jewelry giveaway!
I've covered my own piping many times but never thought about sewing it a little less close so that the original stitching would not show. What a great (and now obvious) tip. Thank you! I do have another bumper to create soon. ;)
ReplyDeleteawesome Can't wait to try it!!
ReplyDeleteDo a tutorial on how to make bumpers! :)
ReplyDeleteThanks so much for sharing this! Super helpful!
ReplyDeleteThanks, nice tutorial....follow up question. I have been trying to make piping for some comforter covers. I have a very stiff and somewhat thick piping. I can't sew close enough to the piping to secure it. It keeps 'floating' in the fabric (cut properly on the bias). The floating is causing twisting and it's not too easy to work with. Any thoughts? Maybe wash the piping to soften? I'm stuck in the mudd. thanks.
ReplyDeleteThank you for this 'tut'. I have been wanting to do piping but it's been freaking me out :) You made it look easy!!
ReplyDeleteWalked nearly a hundred years time to allow the brand is not easy,
ReplyDeleteespecially in the field of fashion, was born in 1867, Lanvin bag brand founded
in the name of her, not only in the nineteenth century, but also
because of her personal artunique love and conservation Lanvin handbag fashion
kingdom never blindly follow fashion. Her foster brand style, simple
and neat, cut and color with deep skill, have repeatedly let the
fashion guru's wonderful design win people embraced fashion. On LANVIN
in the late eighteenth century and many fashion vanguard, common get
rid of the traditional aristocracy to enjoy fashion, to the 20th
century, men's works published more established her territory in the
fashion field.link to www.lanvinhandbagstore.com
This is the easy part. Trying to get it perfectly set in the seam allowance can be hard. any tips here?
ReplyDeleteThe more times you touch the fabric, the more strands will unravel. If you can, sew your project as soon as possible after you cut the fabric. Sewing Machine Judge
ReplyDeleteHi, my name is Patterson and i want to say your website is looking bit flashy and it catches the visitors eyes. Design is pretty simple and a good user friendly interface.
ReplyDeleteThis comment has been removed by the author.
ReplyDeleteVery nice tips. Thanks for sharing it. My wife will love this tutor so much. Our site
ReplyDeleteThis comment has been removed by the author.
ReplyDeleteI appreciate everything you have added to my knowledge base.Admiring the time and effort you put into your blog and detailed information you offer.Thanks.
ReplyDelete.Admiring the time and effort you put into your blog and detailed information you offer.Thanks. Best APEC Reverse Osmosis System Reviews
ReplyDeletehank you again for all the knowledge you distribute,Good post. I was very interested in the article, it's quite inspiring I should admit. I like visiting you site since I always top rated electric can openers
ReplyDeleteThis whole series has been great, and so informative! And I’ve been sewing for a while! I feel like I always learn something new…thank you! I think I found similiar ones at http://cwellnessnatural.com/best-essential-oil-diffusers-reviews
ReplyDelete