WRAP DRESS MADE BY ME (TUTORIAL BELOW) SIMILAR DRESS HERE AND HERE | SUNGLASSES | GOLD INITIAL NECKLACE | SIMILAR TURQUOISE RING
photography by Kenna Reed
I made this dress a few months ago and instagramed it when I wore it to one of the parties during the Reward Style Conference I attended. The dress code for the party was resort style, and I knew we had our Hawaii trip coming up in a few weeks, so I figured I would make a dress that I could wear to both places! This dress is easy and fun to wear. I thought about making it an actual wrap dress, but thinking about trying to keep it tied as I hold Eli and move around on the beach made me decide to do an elastic waistband instead. I'm so glad I did! It was easier to make and much easier to wear.
The dress was great for Hawaii because it worked as a beach cover-up, or as a dress for dinner. When it got wet in the ocean it dried quickly, and the light fabric kept me cool. I had this fabric in my stash forever (what's new..haha!) and I'm so glad I finally found the right occasion to use it!
You can shop some similar dresses below...
If you would like to make this dress but don't know how to sew, make sure you check out my online sewing course at moderngirlsewing.com. We will be having our summer sale starting next week, so it's the perfect time to grab a course! We announced the dates and details of the sale over on our Modern Girl Sewing instagram, so make sure you follow along there so you don't miss out on any of our sales!
CLICK THE LINK BELOW FOR THE FULL TUTORIAL..
Materials:
- 3 yards of lightweight chiffon fabric
- 3 yards of lightweight liner fabric (optional)
- 1/4" wide elastic
- matching thread
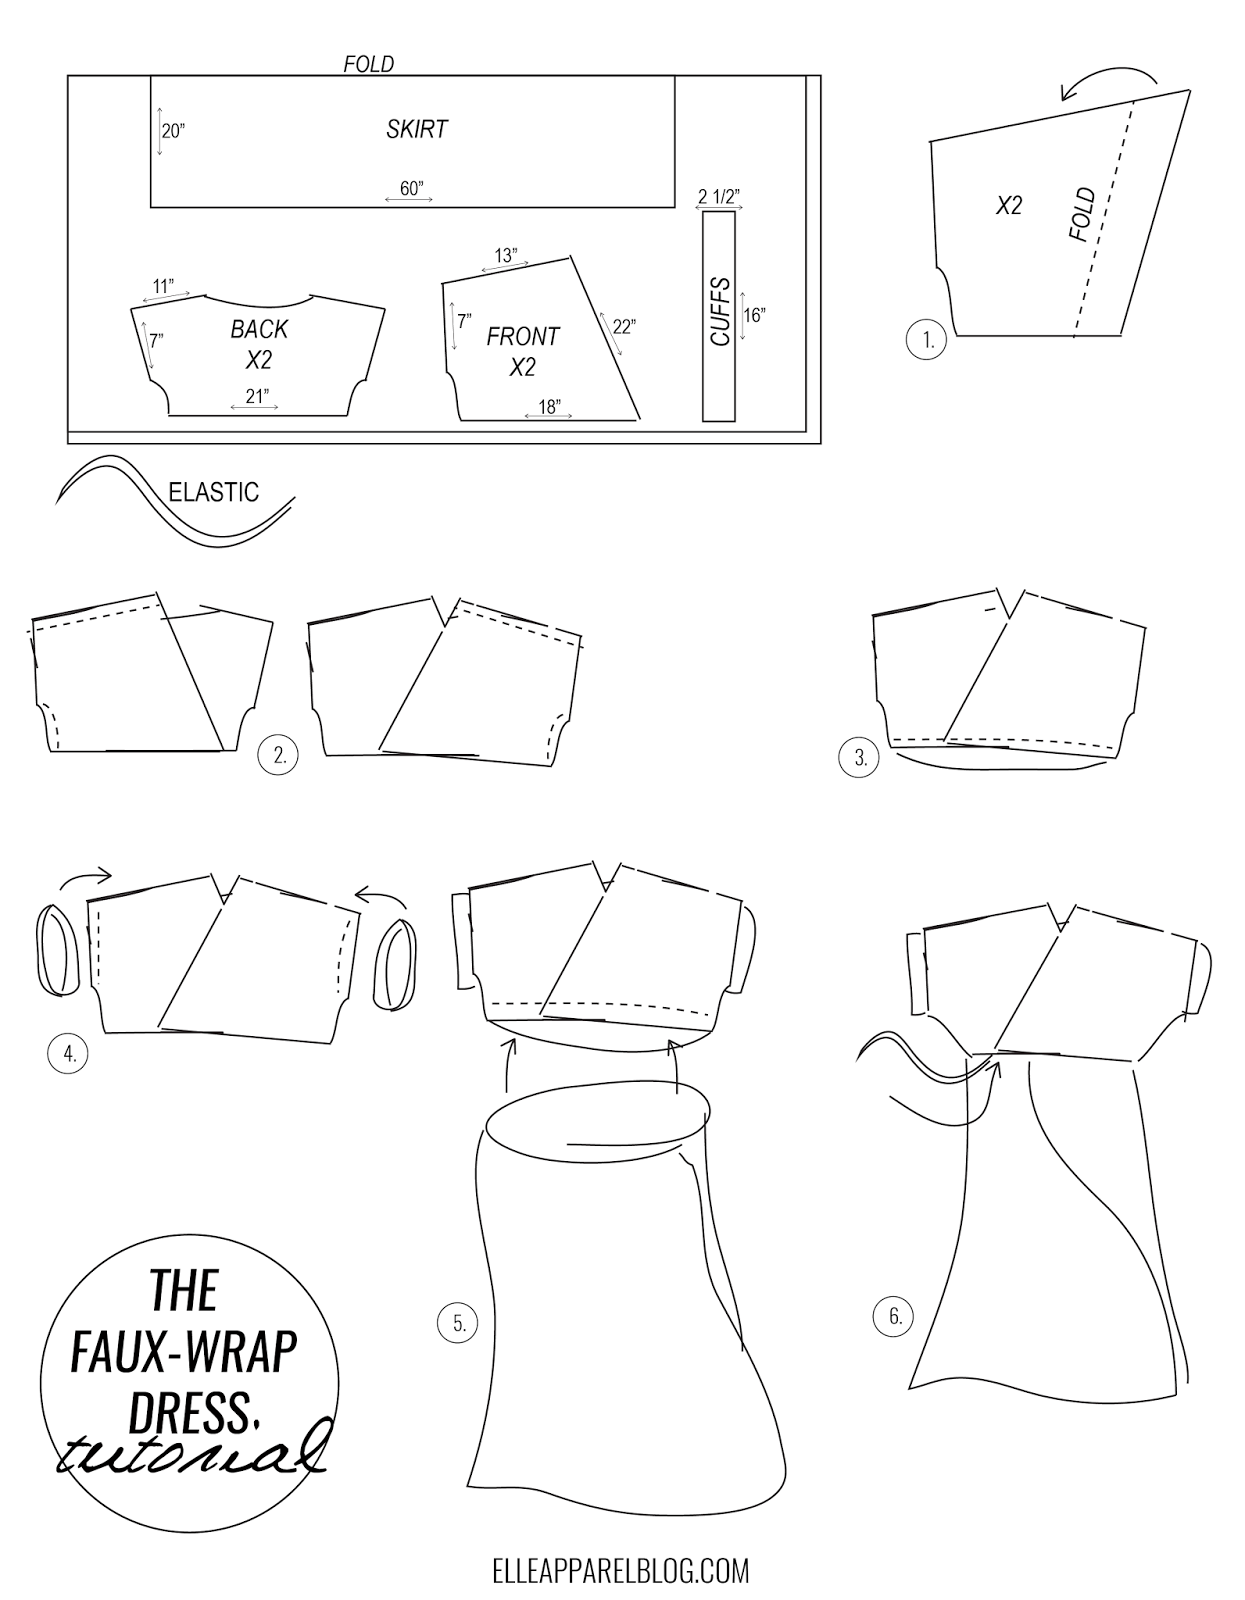
*I listed all of my pattern piece measurements for reference, but here is a simple guide for cutting out your pieces:
BACK width = 1 1/2" x your actual back width
FRONT width = actual front width + 2" (apply this to both front sides)
SKITH length = measurement from your natural length to the floor, + 1" for s.a.
ELASTIC = measure around your waist so it pulls taught but not too tight
Step 1:
Finish all raw edges of the 2 FRONT pieces. Fold back the diagonal side 2", press, and stitch in place at the top and bottom. Repeat this for both pieces.
Step 2:
Finish all raw edges of the BACK piece. With right sides together, lay the one of the FRONT pieces on top of the BACK piece and stitch along the shoulder seams and under the arms. Lay the second FRONT piece on top overlapping and also attach at the shoulder seams and under the arms.
Step 3:
Stitch around the bottom of the FRONT pieces, securing them in place.
Step 4:
Fold and press your CUFFS lengthwise, stitch up widthwise so they create a circle, and attach them to your arm holes.
Step 5:
Wrap your SKIRT around so that the front overlaps and that it is the same circumference as your bodice. This will be larger than your natural waist measurement until you add the elastic. Turn your bodice inside out and upside down and slide the skirt through your bodice. Stitch all around connecting your bodice and skirt with a 1/2" s.a.
Step 6:
Stitch your elastic onto the waist from the inside of the dress. Sew right along the same line of stitching around the waist that you just sewed, and pull your elastic as you sew so that it stretches all the way around the waist. Hem the bottom with a 1/4" s.a. and hem any remaining raw edges.


Yay! I love your sewing tutorials. This is a beautiful dress. I am definitely going to give it a try. I enjoy your fashion posts but this is the reason I come back to your blog again and again. Can't wait for the sale next week!:)
ReplyDeleteOh wow, this dress is stunning! And so simple, but often the best things are. What did you use as lining, just a nude coloured chiffon? Do you have any tips for sewing with chiffon - my machine is not fond of it and it usually gets eaten!!
ReplyDeleteThank you SOOOOOOO much for including dimensions on your pattern pieces! I have been following you and Merrick for a while now and have never been able to get my pieces cut out well enough for my projects to turn out. (I still have trouble even using your pattern making tips on youtube ha ha) This is life changing for me! Thank you thank you!
ReplyDeleteI wish that I would be more "handy" with sewing and making your own clothes. This is such a fantastic dress and you gave a great tutorial on "how-to"! :)
ReplyDeletehttp://www.lartoffashion.com/2016/06/06/sometimes/
Wow, I definitely expected this to have been something you bought! So gorgeous! I will have to try out this pattern as I was thinking about making a wrap dress recently, but the idea of a faux wrap is so much better. Less tugging and more flexibility!
ReplyDeleteJulia - http://bunnybaubles.com
What a fun print!!
ReplyDeletewww.maggiealamode.com
Question: When you sew the elastic waistband, how do you sew it? What kind of stitch do you use? Do you sew directly over the elastic? It's kind of embarrassing that I don't know this because I'm a pretty advanced seamstress, but for some reason, I've never quite been able to figure this out! My elastic always stretches and ends up being an inch or two loose-er than it's supposed to be. Help?
ReplyDeleteLove the design and the fabric! You've got talent, missy!
http://www.susanstange.com